Home > Unity and Oculus/GearVR Setup Guideline
Unity and Oculus/GearVR Setup Guideline
In this article, I am going to show how to set up a Virtual Reality environment in Unity3D by using Oculus or Gear VR. By the time I was writing this blog, my environment setup was Unity3D v5.5.2, Samsung S6, Gear VR and Oculus VR Headset. First of all, the reason I put Oculus and GearVR tutorial together is because GearVR is powered by Oculus, I can cover both VR headsets setup in one.
Oculus vs Gear VR?
Choosing to use Oculus headset or Gear VR headset has become a difficult question. From my own experience, I have listed some pros and cons below:
- Using Oculus requires a high-end PC while using GearVR, you just need a Samsung phone (Keep in mind that the consumer GearVR supports the Samsung Galaxy S6, S6 Edge, S6 Edge+, and Note 5 handsets only at present).
- Gear VR provides seated-only experience, while Oculus headset + Oculus touch provide room scale experience which means you can move around in the spatial environment.
- Samsung phone usually will heat up if you hold a VR session longer than 15 minutes, and the battery is another issue.
Interestingly, I see many people who are interested in using VR to develop their business would finally prefer to use Gear VR because it is easy to setup! Setting up Oculus you need to plug in sensors and cables to a PC and go through many processes, while Gear VR is cable-less. When you want to do testing with a group of real users, you kind of wanna quickly set up the environment and let users try.
Unity & Oculus:
Without further ado, let’s talk about how to use Oculus in Unity. I assume you have already got your Oculus sensors and headset setup, you have Oculus Runtime installed on your PC, so now:
- Open Unity, create a 3D project. In the scene, you would have your default Main Camera and Directional light. (You can add any game objects you want)
- Go to Edit > Project Settings > Player. In the Inspector, you can see the PlayerSettings. Go to Other Settings> Rendering > Tick the Virtual Reality Supported Checkbox (The default VR SDK is Oculus).
- Then run the Scene and wear you Oculus headset, you will be able to see the default blue skybox in the VR headset!
- That’s it! Notes: When VR is enabled in Unity, the camera in your scene is able to render directly to the HMD.
Unity & Gear VR
Making a Unity Gear VR application which runs on Samsung phone is a little bit complicated compared to Oculus. To set up your environment for Gear VR development, you’ll need to set up both Unity and your phone for Android development first. Keep in mind that the consumer GearVR supports the Samsung Galaxy S6, S6 Edge, S6 Edge+, and Note 5 handsets only at present.
- Open Unity, create a 3D project.
- Go to Building Settings > Switch the platform to Android. If you don’t have Android module loaded, you can click Open Download Page to download. After successfully switch to Android platform, then set Texture Compression to ETC2 (GLES 3.0).
-
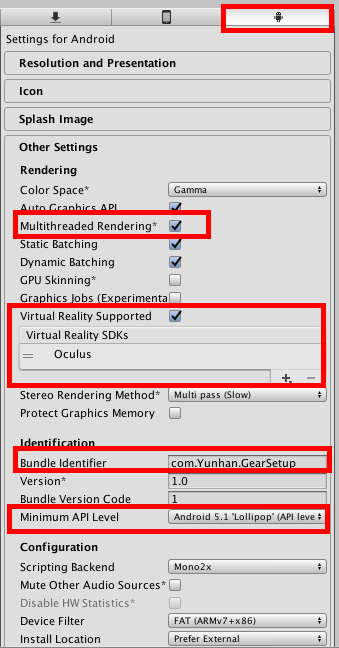
Go to PlayerSettings > click the Android icon. My settings are as below:
- Then go to Edit > PlayerSettings > Time, change the “Fixed Timestamp” and “Maximum Allowed Timestamp” to 0.01666666 (i.e., 60 frames per second).
- Go to Unity Preference > External Tools, under Android section, set your Android SDK path and JDK path. (If you do not have one, here is the link Android SDK and JDK to download)
- After all of these have been done, let’s grab our Samsung phone! And Open the Settings App > Developer Option > Enable USB Debugging.(If you don’t have Developer Option, go to this link to enable the Developer mode).
- The next step is to get something called Oculus Signature File. This is a file which can enable your app to reach the VR functionality on your mobile device. What you gonna do is plug your phone into PC, open Terminal, go to your android_sdk_path, such as
cd android_sdk_path>platform-tools
adb devices
Then you will get your device id, go to the Oculus Signature Generator, put your device ID, and download the signature file. - After getting this signature file, go to your Unity Project. Under Assets folder, create a folder called Plugins, inside Plugins folder create another folder called Android. Inside Android folder, create another folder called assets. Then put your oculus signature file to the assets folder. (The folder structure is Plugins>Android>assets) The folder name must be exactly what I have said, it’s case-sentive
- Finally, go to Build Settings > Click Build and Run. You need to have your phone plugged into the PC, so Unity will build the apk file and run the app on your phone.
- Done! After waiting for a long time, you will finally get your first Gear VR app run on your Samsung phone! Now, insert your phone to the Gear VR headset and enjoy.
Recommend to read:
[1] This is a pretty good article about Unity Mobile Build Target: Android.UnityMobileAppSettings